
The lights showing on the console are just a partial of what is available. Button pushers could become seriously addicted to this thing.
I wanted to show you my new chef's knife. Just LOVE IT! Beautiful! Gorgeous!

Sharp and are the grain lines not to die for? I Know, but Gorgeous!
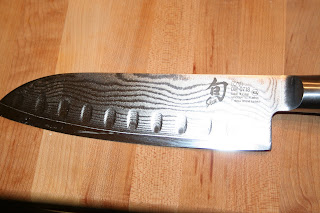
The knife has been calling to me from cutlery stores everywhere. I wonder what Julia Child would say about it? Probably: Gorgeous!
Alright, this blog is taking forever and I still want to show off our first try at authentic tamales.
Oh, Mom, you will have to wait until my next post (I will actually post right away this time) for the braised cukes (cucumbers). Oh so good! YUM!
TAMALES!!!!!
For the pork filling:
2 to 3 Tbs. lard or vegetable oil
3- to 3½-lb. boneless pork shoulder or Boston butt, cut into 3-inch chunks and trimmed
1 medium white onion, roughly chopped
6 medium cloves garlic, lightly smashed and peeled
4 dried bay leaves, toasted
2 to 3 sprigs fresh thyme, marjoram, or mild oregano, or 1 Tbs. dried Mexican oregano
2 to 3 whole cloves1 to 2 guajillo, New Mexico, ancho, chipotle, or other dried red chiles, toasted, stemmed, and seeded
1-1/2 tsp. kosher salt
1 tsp. whole black peppercorns
1 tsp. whole allspice berries
 For the chile sauce:
2 Tbs. lard or vegetable oil
1 medium white onion, roughly chopped (about 2 cups)
2 medium heads garlic, peeled (about 35 cloves)
6 ancho chiles, toasted, stemmed, seeded, soaked in very hot water for 15 minutes, and drained
3 guajillo chiles, toasted, stemmed, seeded, soaked in very hot water for 15 minutes, and drained
2 cups canned, puréed fire-roasted or regular tomatoes
2 cups (approximately) reserved pork cooking broth or lower-salt chicken broth
1 Tbs. tamale-grind masa harina
1 Tbs. brown sugar or honey; more as needed
1 tsp. cumin seed, toasted and ground
1/2 tsp. dried Mexican oregano, toasted (optional)
1/2 tsp. ground allspice
1/4 tsp. ground cloves
Kosher salt
One 2- to 3-inch cinnamon stick
For the masa:
3-1/2 cups tamale-grind masa harina
12 oz. (1-1/2 cups) lard, unsalted butter, vegetable shortening, or a combination, softened
Kosher salt
2 to 2-1/2 cups reserved pork cooking broth
40 dried corn husks
Make the pork filling
Heat the lard or oil in a heavy-duty 8-quart pot over medium-high heat. Working in batches, cook the pork until well browned, 3 to 4 minutes per side. Transfer each batch to a bowl after browning.
Return all of the pork to the pot and add the remaining pork filling ingredients and enough water to cover. Bring to a boil, cover, and reduce the heat to a simmer. Cook until the meat is fall-apart tender, 1 to 1-1/2 hours. Remove the meat from the pot, cool briefly, and shred it using 2 forks. Strain the broth, discarding the solids, and let cool briefly. Skim off the excess fat and reserve the broth. (The recipe may be made to this point up to 2 days ahead; refrigerate the meat and broth separately.)
Make the chile sauce
Heat 1-1/2 Tbs. of the lard or oil in a 4-quart saucepan over medium heat. Add the onion and garlic and cook until beginning to brown, about 5 minutes. Transfer the onion and garlic to a blender.
Add the soaked chiles, tomatoes, and a little of the broth to the blender and purée until smooth.
Heat the remaining 1/2 Tbs. lard or oil in the saucepan over medium-high heat, add the masa harina, and cook for about 1 minute. Add the chile-tomato mixture and cook, stirring regularly, until it has darkened in color, 3 to 4 minutes. Add the sugar or honey, cumin, oregano (if using), allspice, cloves, 2-1/2 tsp. salt, and enough pork broth to thin the purée to a sauce consistency. Add the cinnamon stick, lower the heat, and simmer, stirring occasionally, until the color deepens slightly, the consistency is smooth, and a light sheen develops on the surface of the sauce, an additional 15 to 20 minutes, adding more broth as needed. Season to taste with salt and sugar. (The sauce may be made up to 2 days ahead; keep refrigerated.)
Make the masa
In a large bowl, mix the masa harina with 2-1/4 cups hot (140°F to 160°F) water. Cover and let sit at room temperature for at least 30 minutes or refrigerate for up to 2 days.
Using a stand mixer fitted with the paddle attachment (or a hand mixer), whip the lard, butter, or shortening on medium-high speed until fluffy, 1 to 2 minutes. Add 1 tsp. salt and continue beating while adding the masa in golf-ball-size pieces, waiting a few seconds between each addition. When about half of the masa is mixed in, start alternating the masa with the pork broth until all of the masa is used, along with about 2 cups of the broth. Add 1/4 cup of the chile sauce and whip until light and fluffy, adding more broth if the mixture seems too dry.
To test if the masa is ready, take a small piece (about 1/2 tsp.) and drop it in a cup of cold water. It should easily float. If not, simply whip the masa for a few more minutes and test again. Often, adding a bit more of the pork broth or cool water during this second mixing will help; don’t add too much liquid, however, or you’ll end up with overly soft masa and shapeless tamales.
Assemble the tamales
Soak the corn husks in very hot water for 30 to 45 minutes, or overnight in cool water with a plate or bowl set on top of the husks to keep them submerged. You’ll have enough husks to make the tamales, plus extra to line the steamer and make up for any broken husks.
In a medium bowl, mix 2 cups of the chile sauce with the shredded meat and season to taste with salt.
Wipe a soaked husk dry and put it smooth side up on a work surface. If necessary, trim the bottom with scissors so the husk can lie mostly flat. Put about 1/3 cup masa in the center of the widest portion of the husk. With a spoon or spatula, spread it evenly over one-half to two-thirds of the husk leaving a 1/2-inch border at each edge.
Put 2 to 3 Tbs. of the pork filling in the center of the masa about ½ inch from the wide end.
Fold the corn husk in half lengthwise so the edges meet. Fold the seam back so it’s in the center of the tamale. Fold the tail of the wrapper to cover the seam (at least half the length of the tamale). Flip seam side down onto a tray or rimmed baking sheet. Repeat with the remaining ingredients.
The tamales can be steamed as they are, or tied to make them more secure or to dress them up. To make ties, rip long, thin strips off one or two corn husks. Then place a strip of corn husk under the tamale, wrap it around the middle (making sure that you have some of the tail underneath) and tie securely.

Steam the tamales
Fill a deep 8-quart pot with a pasta insert with enough water to reach just below the insert. Without the insert in place, cover and bring to a boil over high heat. Have ready a kettle or pot of almost boiling water to add if the water gets low. Arrange the tamales upright (open end up) in the insert, leaving room for the steam to circulate. Fit the insert into the pot over the boiling water. Use he extra husks to cover the tamales (this helps concentrate the heat). Cover the pot with a lid. Steam for 1 to 1-1/2 hours, adjusting the heat as needed to keep the water just boiling. Check the water level frequently and add more as needed to keep the pot from going dry.
To test for doneness, quickly remove a tamale and replace the lid on the pot to continue the cooking. Put the tamale on the counter for a few minutes and then carefully unwrap it. If ready, the masa should be set and will pull away from the wrapper easily.
Let the tamales rest for 5 to 10 minutes before serving to allow the masa to firm up. For softer tamales, let them rest in the pot with the heat off and the lid and extra leaves removed. For firmer tamales, let them rest out of the pot, covered with a cloth.
Serve the tamales in their wrappers with extra sauce passed on the side, and have diners unwrap them just before eating. Once unwrapped, they cool quickly.

The tamales can be broken down into steps over a 2 to 3 day period. I absolutely love the flavor of every part making up the whole tamale. Note: I did use lard and had such a guilty conscience for doing it. I think this is only the second time in my life to use lard. The first was frying chicken to see if there was a flavor difference.


 The doily has not been blocked and set yet. Whether this is the correct way of saying the doily needs to be finished or not ~ well, this is my first time ever trying. If anyone has pointers . . .PLEASE feel free to tell me.


 Next, cube up your potatoes and toss them in as you go with the frying bacon.

 I accidentally loaded an extra picture here too, so here you go.

 The picture may be too dark, but no more elements showing. Just a fan in the back with an upper and lower light in the oven.


